Showing posts with label Stampendous. Show all posts

Wednesday, April 6, 2011

Night Owl Here…

Spring Has Sprung_1_Mar 2011

Thank you so much for your oh-so-sweet comments on my last post. Having been such a lousy blogger for the past couple of weeks, I didn’t expect ‘em.

Here is a card I made last week with new stamps from Flourishes. While I saw so many lovely cards made with this set (here and here and here), it was this gorgeous card that made this set irresistible to me. That sweet nest – I couldn’t help myself.

This one was colored with a waterbrush and ink from my ink pads.

Materials & Tools: Colonial White, Olive, and Stampin’ Up Crumb Cake cardstock; Passages paper packet; Black, Olive, Garden Green, Heavenly Blue, Desert Sand, Brown Bag, Chocolate, Stampin’ Up Crumb Cake, and Tim Holtz/Ranger Antique Linen Distressing Ink stamp pads; Flourishes Spring Has Sprung and Stampendous Pattern Trio stamp sets; CTMH Speckled Background stamp (retired); Garden Green mini brads; Ecru crochet lace and olive twill ribbon from reasonableribbon.com; waterbrush; Cuttlebug w/Nestabilities Classic Circles set; Foam texture tool.

A Slice of Life: I had a fun afternoon with my Mom. We went out for lunch and then did some shopping. I finally found a pair of jeans that fit better than any of the others I currently own. What is it with all the “low rider” jeans these days. Fine for 18-year-olds maybe, but I don’t think the crack of a 57-year-old’s backside is very becoming. LOL. Tonight, I am trying to get my mind wrapped around the idea of going back to work tomorrow evening. I hope things are straightened out from the end of last week. Management couldn’t leave a good thing alone and decided to make some procedural changes in the way we get the parts we photograph. Things didn’t work out at all on Friday night, which was very frustrating, so I am hoping they have either worked the kinks out of the new process or have gone back to the way things were done previously.

For now, I am off to bed with hopes of sleeping a little later into the day. I hope yours is a happy Hump Day! Take care, and thanks for stopping by.

Friday, December 17, 2010

Drummer Boy

Drummer Boy_Dec 2010

Last year, I received this precious stamp from a special friend, and once in the mood to color, I could not wait to ink it up again. I mentioned last year that “Little Drummer Boy” has always been a favorite Christmas song. As for the word, “Noel,” which is French for Christmas, I chuckle almost every time I see it. I’ve told this story before, too. One of my first experiences with an alphabet stamp set was at Christmastime. I laid my stamps out on a block, inked it up, and oh-so carefully stamped “Leon” on my card. Had anyone been watching, I am certain the look on my face would have been a pretty funny sight. Funnier yet was the fact it took a few moments for me to realize what I had done wrong. Initially, I wondered, “What the heck is wrong with these stamps?” LOL.

Materials & Tools: Colonial White and Cocoa cardstock; Basic Grey Jovial 6x6-inch paper pad; Black, Cocoa, and Tim Holtz Antique Linen Distressing Ink ink pads; Stampendous Drummer Boy stamp and CTMH Say it in Style stamp set; Antiqued copper mini brads; Prismacolor color pencils; Gamsol odorless mineral spirits; Blending stumps; Fiskars Apron Lace border punch; Sponge distressing tool; 3M foam mounting tape.

A Slice of Life: I took a half-day of vacation, did some shopping, and went to visit Mom this afternoon. Tomorrow, I will be attending the memorial service for my cousin in Crookston while the rest of my family celebrates “Carlson Christmas” at the hunting cabin. Although I am going to miss the fun, “no muss, no fuss” holiday atmosphere that one finds at the cabin, I need to be with my extended family tomorrow.

Tonight, I’m taking it easy. How about you? Are the elves at work at your house this weekend? Whatever you’re doing – enjoy! “See” you again soon.

Wednesday, December 15, 2010

And a Red Bird in a Pear Tree …

I love this simple image, which colored up quickly with markers. As there are fine speckles in the patterned paper, I speckled my image, too, and distressed Partridge Tree_Dec_ 2010the edges with Tim Holtz Antique Linen Distressing Ink from Ranger. As for a sentiment, I guess it is going on the inside. I didn’t even miss it until know.

Materials & Tools: Colonial White and New England Ivy cardstock; Mistletoe Level 2 paper packet; Black and Tim Holtz Antique Linen Distressing Ink stamp pads; Holiday Red, Garden Green, and Buttercup markers; Stampendous Partridge Tree and CTMH Speckled Background (retired) stamps; Red spiral clip; Foam distressing tool.

A Slice of Life: I need to be careful with regard to the titles I give my posts. Yesterday’s post attracted a comment from some weirdo who preached about the sins of eating meat. Delete. While I understand passion – I’m passionate about a lot of things – I don’t understand how single causes become missions that seem to consume people.

My day was busy and productive, and – best of all – I didn’t have to eat at 10:30. One of the gals in our department wasn’t in today and had left her invitation with a co-worker who passed it on to me. The food was scrumptious. Had they authorized us to take 90 minute naps afterwards, it would have been a perfect day. LOL.

It’s Thursday already tomorrow. I need to make a trip to Grand Forks within the next couple of days but haven’t made definite plans or even mentioned it to Husband, as I’m trying to figure out what the weather is going to do. It warmed up a bit here (into the teens and 20s, which makes the weather much more unpredictable. Miranda and Dustin had a doctor’s appointment today but obviously, there isn’t anything to report, because he hasn’t called. I am impressed that he has not missed a single appointment throughout this entire pregnancy.

I hope you are having a wonderful week. Mine remains a little off kilter, which, under the circumstances is probably understandable. As I stamped up a storm on Sunday evening, however, I should be back tomorrow evening with a card. I’ll “see” you again then. In the meantime, take care and thanks for stopping by!

Monday, November 29, 2010

Christmas Continued

Snow Days_Nov 2010

This first card was inspired by this beautiful card,which was posted yesterday on my friend Barb’s The Buzz blog. Barb was the guest designer for 2010 Christmas Card Challenge Week #52 on Sparkle Creations Weekly Christmas Card Challenges blog. I love the sketch and at this late date, can’t tell you how much I wish I had played along all year.

There isn’t much to say about my card that isn’t self explanatory. I used Crystal Stickles on the rooftops and trees, and while you can see some of the sparkle in the photo, it is much sparklier in real life.

Materials & Tools: Colonial White, Bamboo, and New England Ivy cardstock; Mistletoe Level 2 paper packet; New England Ivy and Tim Holtz Antique Linen Distressing Ink stamp pads; Snow Days stamp set; New England Ivy chiffon ribbon; Crystal Stickles; Cuttlebug w/Stampin’ Up Square Lattice embossing folder and Nestabilities Classic Ovals set; Sponge distressing tool.


Partridge Tree_Nov 2010


This next card was a quick and simple creation. With no embellishments, it is USPS friendly, too. I colored the stamped image with Prismacolor colored pencils and OMS.

Materials & Tools: New England Ivy and Stampin’ Up Crumb Cake cardstock; Black and New England Ivy stamp pads; Stampendous Partridge Tree stamp and CTMH Say it in Style stamp set; Prismacolor colored pencils; Gamsol odorless mineral spirits; Blending stumps.


Say it in Style_2_Nov 2010Can you handle one more? This last card was inspired by the poinsettia Debbie Olson (Thinking Inking) made for her card that was shown here on the CLASSroom blog. The flower is made with Tim Holtz Tattered Florals Alterations die. I used Cranberry cardstock, stamping the text and sponging the edges of the petals with Garnet ink. I used the handle of my piercing tool to curl the petals of the top flower for a little added dimension. More quick and easy.

Materials & Tools: Colonial White, Cranberry, and New England Ivy cardstock; Passages and Mistletoe Level 2 paper packets; New England Ivy and Garnet ink pads; Hero Arts Friends Definition background stamp and CTMH Say it in Style stamp set; Button from my stash; Ecru crochet cotton; Piercing tool; Cuttlebug w/Tim Holtz Tattered Florals Alterations die; Sponge dauber.

A Slice of Life: Busy at work, I sailed through the first workday of the week. If they are all like this (and I anticipate they will be, it will be 5 o’clock on Friday in no time. It’s been snowing and blowing since midafternoon. If the first 10 or so days of snowy weather have been any indication, it’s going to be a blustery winter. We’ll just hope it isn’t too long. I made a beeline home from work today to sew Bjorn’s patches on his Cub Scout shirt before Pack Night this evening. After they bought, it Cameron called to ask if there was a quick/easy way to put patches on a Scout shirt. Nope, I told him, as far as I knew they still had to be sewn on, and yes, I would do it for him. It was like history repeating itself. Having been Mama Den Leader turned Cubmaster with her Cub/then Boy Scouts, I have had plenty of practice at sewing on patches. I am as pleased as punch, too, to see the Scouting tradition continue in a new generation.

How was your day? I hope it was a good one. Before I get ready for bed, I’m going to make a tour around the blogosphere and a stop at my stamping desk where I plan to take a little break from the Christmas cards I have been making these past few days. Have a great Tuesday, and thanks for taking the time to visit!

Sunday, May 9, 2010

I’d Pick You …

I'd Pick You_May 2010

Here’s the card I made my mom for Mother’s Day. And while it looked kind of puny amongst the beautiful Hallmark-type cards she received from my siblings, I know she loved it just as much, because I made it.

The stamp set is from Stampendous and one that Jeanne used to make a card she sent me a while back. I loved her card and the cute, contemporary look of the stamp and had to have the stamp set, too. With thoughts, however, that the set was exclusive to Archivers, I figured I would have to find it somewhere else. To my surprise, I found it on eBay. To my delight, I got it new-in-the-package for a mere $4.

As for the card details, they are few. I colored the image with Prismacolor pencils and OMS. As I initially thought I might be mailing the card, I kept it flat (as in embellishment-free) except of the image which was attached to the card with foam mounting tape.

Materials & Tools: White Daisy and Crystal Blue cardstock; Basic Grey Urban Prairie 6x6-inch paper pad; Black Stamp pad; Stampendous Hand of Friendship stamp set; Prismacolor colored pencils; Gamsol odorless mineral spirits; Blending stumps; Fiskars Apron Lace border punch; 3M foam mounting tape.

I hope your day was as wonderful as mine ended up being. I woke up a bit out of sorts this morning with thoughts of things I shouldn’t think about. Then, I thought I’d made a mistake on a gift I had purchased, which upset me more. Sometimes, I don’t feel like I can get anything right. After a little crying jag, which totally baffled Husband, I pulled it together by the time we arrived at our dinner destination. It ended up being a great day with mom, most of my siblings, and some of the grandchildren/great-grandchildren. Cameron, Sarah, and the boys were already there when we got there, and it was awesome to have the little boys come running across the yard to greet Grandpa and me. When we got back to town this evening, Dusty came over, and we went out for a light supper, which was very nice, too. While I am sure I’ve said this before, my sons have grown up to be wonderful men. I’ll take some credit. Being their mother has been the most meaningful, most important thing I’ve done in my life. And for the most part, I got that right, which makes me feel pretty good.

After so much activity, however, I am tired beyond words and not at all mentally prepared for Monday and another workweek. It’s time to head to bed. I hope yours is a fantastic week. “See” you again tomorrow!

Sunday, March 21, 2010

A Few Challenge Cards

This first card is my take on Taylored Expressions Sketch Challenge #105. My inspiration came from these beautiful cards posted recently Treasure Life_2_Mar 2010 by my blogging buddy Deb’s on her Scrapbook Czar blog. No lack of Mojo there!  I love the way she created three gorgeous cards in one sitting – all using DCWV’s La Crème Matstack.

My card is pretty straightforward. I inked around the edges of the focal point image and sentiment with Bamboo ink using a sponge dauber. I struggled a bit when it came to placement for the sentiment. In fact, since starting this post, it has been moved up from the lower left corner. I like it better now … I think. I always find it interesting how, when looking at my card on the computer monitor, I see things (potential improvements usually) that I don’t see when the card is right in front of me.

Material & Tools: Colonial White, Black, and Bamboo cardstock; DCWV La Crème Matstack; Black and Bamboo ink pads; Close to My Heart Treasure Life and TLC stamp sets; Hero Arts pearl accents; Martha Stewart Large Butterfly punch; 1 and 1-1/4 inch circle punches; Sponge dauber; 3M foam mounting tape.


Fresh Fruit_Mar 2010


“Fruits of Labor” is the theme for Raise the Bar Challenge #10. I colored my image with Prismacolor pencils and OMS, trying my darnedest to get the colors to coordinate with those on the patterned paper.

My initial thoughts were that this card would have to be one for the husband. Then, I thought about all the people I collaborate with on a one-on-one basis at work. I’m going to tuck this card into a desk drawer and save until such time as I’ve brought a tough project to fruition with the help of a co-worker.

Materials & Tools: White Daisy and Cocoa cardstock; Basic Grey 6x6-inch Nook and Pantry Paper Pad; Black ink pad; Stampendous Fresh Fruit stamp set; Ribbon from Wal-Mart; Antiqued Copper mini brads; Black My Legacy Writer; Prismacolor colored pencils; Gamsol odorless mineral spirits; Blending stumps; 3M foam mounting tape


A Tweet_Mar 2010


This final card today is my contribution for Unscripted Sketches #47. I must have pulled out 10 stamp sets before finally selecting “A Tweet.” I inked up my bird stamp with Honey ink and then used a sponge dauber to ink some Cocoa ink around the edges to give the image a little added dimension. It’s wing, which is not part of the stamp set and was cut freehand, is popped up with a piece of foam tape.

Materials & Tools: White Daisy and Cocoa cardstock; Basic Grey 6x6-inch Origins paper pad; Cocoa, Honey, and Bamboo ink pads; Close To My Heart A Tweet stamp set; Ribbon from Michael’s; Antiqued Copper bitty and mini brads; Stampin’ Up Photo Corner punch; Sponge dauber; 3M foam mounting tape.

I hope you are having a wonderful weekend. The wedding yesterday was lovely. I’ll tell you a bit more about it on a day when my post isn’t already so long. For now, I’d better finish up on some projects I started yesterday. Thanks for stopping by, friends! Later …

Sunday, February 14, 2010

Simple Sunday, too!

Field of Blooms_Feb 2010

I came across this little flower image this morning while looking for a different stamp and could resist making a card with it. The image looks like it was drawn by a child and reminds me of Bjorn.

It’s probably been a couple of years since I taught him how to draw flowers, trees, the sun, etc. He was one who always wanted me to do his drawing for him, and I obliged until one day when I told him, “You can do this, Bjorn.” I had him copy what I was doing and praised his every stroke of the marker. When he was done, he was so proud. And while his drawing has improved significantly, he’s still doing things the way I showed him. His sun always has a smiley face. So sweet.

About my card, I stamped my image on textured cardstock and colored it with markers. I used foam tape to mount the image to the card base. Simple. Sweet.

Materials & Tools: White Daisy Textured and Black cardstock; Black ink pad; Holiday Red, Topiary, Dutch Blue, Sunflower, and Chocolate markers; Stampendous Field of Blooms Cling stamp and CTMH Say it in Style stamp set; Ribbon from Wal-Mart; Black mini brads; 3M foam mounting tape.

Happy Valentine’s Day! I’m busy today doing all the stuff I didn’t do yesterday. I think it’s just going to be Grandpa and me celebrating, and I think he’s about given up with regard to “doing” something. He mentioned a half a dozen or so different places to go out to eat with none of them causing me to jump up and down with excitement. After 32 years, he should know food is not the way to my heart. I eat to live (as opposed to live to eat) and am just as happy with a peanut butter sandwich as I am with steak and lobster. Now, if he’d go out and get me a box of chocolates … LOL.

No, I’d better get back with the program. I hope your day is wonderful. Thanks for stopping by!

Sunday, February 7, 2010

Just Because …

It was my original intention to make Valentine’s Day cards, but I think they are going to be “Just Because” cards instead – cards to drop in the mail or tuck into backpacks with Love Botz_Feb 2010encouraging messages.

The images on both cards were colored with Prismacolor pencils and odorless mineral spirits. The sentiments on both were attached to the cards with foam mounting tape.

I used Liquid Glass to attach the googly eyes, which was the most time consuming element of this card making session. I would have sworn I had 10 thumbs for the number of times the little buggers got away from me.

I went around the perimeter of both stamped images with a My Legacy Writer to give them a little added definition against their yellow mats. A sponge dauber with a little blue ink was used to define the punched caption on the top card.

Love Botz_2_Feb 2010  Materials & Tools: White Daisy, Sunny Yellow, and Orange cardstock; Tinkerin’ paper packet; Black and Dutch Blue ink pads; Stampendous Love Robotz stamp set; Brads and googly eyes from my stash; Prismacolor colored pencils; Gamsol odorless mineral spirits; Blending stumps; 1 and 1-1/4 inch circle punches; Black My Legacy Writer; Liquid Glass; EK Success Caption punch; 3M foam mounting tape.

Ah! Superbowl Sunday. That doesn’t mean much to me. And, as the Vikings aren’t playing, I don’t suspect the game will be too much of a disruption in my household. All things considered, that is a good thing. LOL. While the details haven’t been established yet, I’m looking forward to spending some time with my grandsons today, too.

Last night was a quiet evening at home with Marv winning the best out of three in cribbage. No surprise.

I hope your weekend is going well. Enjoy Sunday! Later…

Thursday, October 22, 2009

Drummer Boy

Drummer Boy_Oct 2009

Isn’t this a sweet image? It’s Drummer Boy from Stampendous and part of The Nativity Cast. A friend brought the stamp to me the other night. Little did she know that Katherine K. Davis’s “The Little Drummer Boy” has been my favorite Christmas song since I was just a little girl. I caught the message of the song early on.
I am a poor boy, too … I have no gift to bring …That’s fit to give the King … Shall I play for you … On my drum? … Mary nodded … The lamb and ox kept time … I played my drum for Him … I played my best for Him … Then He smiled at me … Me and my drum. Life isn’t about having the most or the best. It’s about trying to be our best.

Now, about my card. I colored the image with Prismacolor pencils and OMS. I kept thinking the little guy should be dressed in red and green and had to keep reminding myself that he was a drummer and not an elf. As for the patterned paper, it’s from Basic Grey’s Wassail collection. The 6x6-inch pad I bought last year is pretty thin and my favorite patterns gone. I still love it and need to get some more. Oh, and because I’d stamped my image on Colonial White cardstock, I had to “unwhiten” (new word) the patterned paper. To do so, I used my Bamboo ink pad and the “direct to paper” technique.

Materials & Tools: Colonial White cardstock; Basic Grey Wassail 6x6-inch paper pad; Black, Barn Red, Bamboo, and Twilight ink pads; Stampendous Drummer Boy stamp; CTMH Peace on Earth stamp set; Natural twill ribbon; Prismacolor colored pencils; Gamsol odorless mineral spirits; Blending stumps; Dove blending pen; Black My Legacy Writer; Sponge dauber.

How was your day? Mine was A-OK, and it’s Friday tomorrow! Yeah!! Being it seems I had to tell a story at the beginning of my post, I’ll keep the end short again. Enjoy the evening, friends! Later…

Saturday, August 29, 2009

Simple Saturday

Oh, boy! I've been a lousy blogger this week ... not to say I don't have an excuse or two. The extreme fatigue I was experiencing (tiredness I was blaming on having so much on my mind) earlier in the week was most likely leading up to yesterday, which I spent flat on my back in bed. With a headache that measured a solid 8.5 on a scale of 1 to 10, body aches that extended to every hair on my head, and a fever, I figured I had full-blown influenza. But, after sleeping all day, I woke up around dinnertime feeling better. Today, I'm at around 80 percent. Whatever it was appears to be of short duration, which is good because I have things to do and places to go.

My Simple Saturday offering was created with a sweet little stamp that landed in an online shopping card a while back that I hadn't gotten around to using until now. The image was colored with markers with the exception of the background which was filled in with a watercolor brush and Petal ink. The image was stamped on Colonial White, backed with Olive cardstock, and mounted to the card with foam tape. The rest of the paper is from DCWV's Latte Matstack. I used a Gelly Roll Clear Sparkle pen to add a bit of glimmer to the bee's wings.

Material & Tools: Colonial White and Olive cardstock; DCWV Latte Matstack; Black and Petal ink pads; Petal, Chocolate, Garden Green, and Sunflower markers; Stampendous Happy Word cling stamp; Garden Green mini brads; Watercolor brush; Stampin' Up Ticket punch; 3M foam mounting tape.

Thank you for all of your kind birthday wishes. It was a good day. Today, I'm going to do as much as I feel up to doing. Tonight, we have a wedding reception to attend. I hope your day and weekend are wonderful. Later...

Sunday, August 2, 2009

A Slow Start ...

Have I told you lately that I'm not loving Blogger. I had this post half done, and all of a sudden the whole darned thing disappeared - photos, text, all of it. I shouldn't bitch (oops ... complain) about a service that's free. However...

With that out of my system, my first card would most definitely qualify for a "Simple Saturday" offering. The focal point image was cut from patterned paper, conveniently from the same Studio 45 paper I used for the background. Pretty, isn't it? The Stamp Simply challenge this week on the No Time to Stamp? blog is "Lovely Lace." I mounted the paper image on a piece of chipboard and attached it to my card with foam tape to accommodate the bulk of the ribbon and crocheted lace. With hopes of coordinating the paper I used for the sentiment with the patterned paper, I distressed it with Desert Sand and Brown Bag ink. I could have added a brad or two but instead, asked the Why? question and left it as it.

Materials & Tools: Vanilla Cream and Desert Sand cardstock; Studio 45 Botanicals Collection Antiquity paper; Cocoa, Desert Sand, and Brown Bag ink pads; Stampendous Flexible Friendship Wishes stamp set; Crocheted lace from Wal-Mart; Cocoa grosgrain ribbon; Chipboard; Sponge daubers; Stampin' Up Word Window punch; 3M foam mounting tape.

My next card is my take on Weekend Sketch Challenge #91, hosted this week on the Fresh & Fun blog. Again, I used paper from
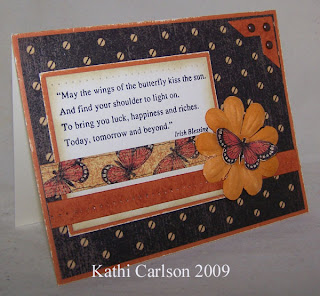
 Studio 45's Botanicals Collection. I will have to admit that the finished product is not what I originally had in mind. Once I stamped the sentiment, I found the larger stamped butterfly I had planned wasn't going to work. Lucky for me, I came across a paper flower that I'd colored with my Creme Brule marker I while back (that obviously didn't work for whatever I intended it for). The little butterfly in its center was cute from the patterned paper. One more thing. The texture on the Autumn Terracotta cardstock (if you can see it) was created using the Saran Wrap technique. That's wadding up a piece of plastic wrap and using it like a stamp. It's a favorite of mine, especially when I want to make my paper look like suede or denim. I like it when cards that evolve turn out as well as this one did.

Materials & Tools: Colonial White and Autumn Terracotta cardstock; Studio 45 Botanicals Collection Ode to a Butterfly paper; Black, Bamboo, and Autumn Terracotta ink pads; Creme Brule marker; CTMH Butterfly Kiss stamp set; Big Pinks paper flower; Antiqued Copper mini brads; Stampin' Up Photo Corner punch; Piercing tool: Stampin' Up Piercing Guide and Mat; Sponge dauber; Sanding block; 3M foam mounting tape.

For this last card, I weaned myself away from the Studio 45 paper, and reached for Basic Grey's Lime Rickey. Man, there's some wild paper in that pad! This card meets the criteria of two challenges. The sketch is this week's A Sketch for You to Try on the i{heart}2stamp blog. And, the current Challenge #9 on the Pile it on! blog is to use at least three flowers on one's card and combine that challenge with another. I have to say this card satisfies my blue/green color combination yen, even though the Outdoor Denim cardstock and ribbon look black in the photo. Speaking of, I think my poor camera had a bit of a time with this card cuz' I took several shots and didn't get a single one that was clearly in focus. Too much goin' on, I suppose! We wouldn't want to blame it on the photographer or anything. LOL.

Materials & Tools: White Daisy, Citrus Leaf, and Outdoor Denim cardstock; Basic Grey Lime Rickey 6x6-inch paper pad; Black and Outdoor Denim ink pads; Penny Black Toadilly and Papertrey Ink Mixed Messages stamp sets; Outdoor Denim grosgrain ribbon; Just Blooms White Daisy and Summer Posies paper flowers; White Daisy Bigger Brads; Mini brads from my stash; Prismacolor colored pencils; Gamsol odorless mineral spirits; Blending stumps; McGill Multi-tag punch; Cuttlebug w/Nestabilities Classic Circles set; 3M foam mounting tape.

With all these cards and so much text, I won't bore you with too many details of my ordinary life. Besides, between stamping last night and then going to bed, there isn't much to say since my last "report."

Oh, one thing... So ya think I'm brave to shop for clothes on the Internet, huh? I've been lucky, I guess. I always check out a site's return policy before spending too much $$. The company from which I ordered my "wedding suit" guarantees satisfaction and provides a return service label with the order. Shipping it here was $14.95. If I need to return it, the postage will be $6.95. Thus, should it not work out, I will be "out" $21.90. Were I to physically "shop," I would have to travel 55, if not 120, miles to a town that has real stores. In my neck of the woods, gas isn't cheap. And so, for those of us who live in the boondocks, the Internet is a godsend. I'll let you know how my new duds work out. So long as I don't try it on while eating a slice of pizza, I should be OK. LOL.

Hope your day is a good one! Thanks for stopping by! Later...

Saturday, June 13, 2009

Simple Saturday Times Two!

A one layer card. I don't make very many of these anymore. Isn't this the sweetest little bunch of flowers? They remind me of a child's drawing. Bjorn draws the cutest flowers. When I showed him how, the first words out of his mouth were, "I can't do it, Grandma." "Yes, you can," I told him. Step-by-step, we drew that first flower together, and he's been drawing them all on his own ever since. "Yes, you can" are important words for children. If they hear them often enough, they start saying them to themselves and believing in themselves.

About my card, I colored the images with markers. At most, it was a 10-minute card.

Materials & Tools: White Daisy cardstock; Black ink pad; Clover Meadow, Sunflower, Brown Bag, Hydrangea, Lilac Mist, Dutch Blue, and Holiday Red markers; Stampendous Field of Blooms stamp and Say it in Style stamp set; Cranberry gingham ribbon.

My second card was a 10-minute job, too. It was inspired by this card on Maria's Scraps by M blog.

Materials & Tools: Stampin' Up Kraft cardstock; CTMH Silhouette paper packet; Black ink pad; Stampendous Field of Blooms stamp and CTMH Say it in Style stamp set; Cranberry grosgrain ribbon.

I'm having a great day. How about you? After posting this morning, I finished up some challenge cards, which will be appearing next week on Erin's Inky Smiles blog. Creating them was quite an adventure. Fun. Definitely a challenge. You'll see why when the time comes.

I don't know if you've noticed or not, but I haven't complained about the weather for a few days. That's because I don't have anything to complain about! We've had at least three consecutive nice days with decent weather forecast for the coming week. Temperatures are in the 70s - perfect in my book.

With that, I think I'll catch a little nap before Marv gets home from the golf course. I hope your weekend is progressing wonderfully. Enjoy! Later ...

Wobot

If I told you how long it took me to make this card last night, you'd laugh out loud. I had "no mojo." None. Nada. I didn't have any energy either, and thus, no post yesterday. I was asleep for the night shortly after 9 p.m.

About my "no mojo" card, the stamps are cute, and regardless of the less than great card design, the four-year-old "wobot" lover who receives it will think it is very cool, particularly if it arrives in the "real" mail.

Materials & Tools: White Daisy, Star Spangled Blue, and Clover Meadow cardstock; Black and Clover Meadow ink pads; White Daisy Pigment ink pad; Stampendous Love Robotz and Papertrey Ink Polka Dot Basics stamp sets; Silver mini brads; Prismacolor colored pencils; Gamsol odorless mineral spirits; Blending stumps; EK Success Dotted Wave Edger punch; Black My Legacy Writer; Cuttlebug w/Spots and Dots embossing folder; 3M foam mounting tape.

When I posted Thursday, I was off to have an afternoon adventure with the little guys. The local library kicked off its summer program for children that day with Zoo Man at one of the parks. The boys loved the program and were thrilled by the opportunity to "pet" a 23-foot Burmese python. Grandma passed. From there, we went to have their photographs taken by a traveling photographer who had set up shop at a local drug store. Although they were in silly moods and not all that cooperative, I think the photos will turn out OK. Then, it was off to another park to play before eating supper at the Dairy Queen. There was a puppet show at the library that evening, too, but we were all too tired by then and happy just to hang out at home. Yesterday, I went to work very early, came home early, and as I stated previously, went to bed early. I have lots of stuff to do today and best get to it. I'll be back later with a Simple Saturday post. Between now and then, I hope your day is a good one! Later ...

Wednesday, June 3, 2009

Finally ...

I got around to making a round card! I've got to be one of the last person who hangs around the blogosphere to have made one. Why? I dunno. It was kind of fun.

It was this great card on my friend Sharli's Sharli's Place blog that inspired me to try my hand at a round card. Isn't her red, white, and blue card fun? My color scheme was determined by the right-size piece of Blush cardstock laying on my desk last night.

With regard to my design, there isn't a lot to say. I inked my stamp with markers. The sentiment stamp is from a set aptly named "Flexible Friendship Wishes." The dotted vellum I used for the butterflies is from a book of Paper Pizazz patterned vellum that I received as a gift and have been hoarding for years. I did learn something with this one. Had I lined up the scallops right, the card would have stood up straight so I could photographed it that way. As it was, I had to lay it flat. Next time ...

Materials & Tools: White Daisy and Blush cardstock; Garden Green ink pad; Garden Green and Blush markers; Stampin' Up Essence of Love and Stampendous Flexible Friendship Wishes stamp sets; May Arts ribbon; Kaiser Krafts pearl accents; Cuttlebug w/Nestabilities Classic Circles set.

Happy Hump Day! This week is flying right by. While I got some stuff done last night, I didn't knock off everything on my list, so I'm back at it tonight. Tomorrow night, we're going to have overnight guests ... our two favorite little people! Hurray!! With that, I'm going to go see what I can get done. I hope you're having a wonderful day! Thanks for stopping by. Later ...

Monday, June 1, 2009

Sweet ...

Every time (OK, so maybe not every time) she gets the urge to "shop," the sensible Kathi starts thinking about some of the things she has laying around that she hasn't gotten around to using yet. In this case, it was a cute little cupcake stamp set and some equally cute patterned cardstock.

My card was inspired by one I saw in Cards magazine. Did you know that you can now subscribe to the digital version of this magazine? To try it out, I purchased the online version of the June issue for $4.95. More at the end of my post ...

Back to my card, the patterned cardstock is from My Mind's Eye, both designs on the same sheet. I cut one 4-1/16th by 5-5/16th inch piece and used a lid from a drawer in the kitchen as a template to cut the curve with an craft knife. Then, I just reversed the pieces and fit them together on the pink background piece. The white background piece was created with a sentiment stamp. Getting the rows of words as straight and well-spaced as they are was nothing more than sheer luck. LOL.

After I stamped and cut out the cupcake pieces, I adhered them to the card before "frosting" my little cake with white Liquid Applique. The itty, bitty pink sprinkles were created with what fell from my EK Success Dotted Wave Edger punch. I just punched right over the wet Liquid Applique, letting the pieces fall wherever - kinda like real sprinkles. Once the Liquid Applique was dry, I puffed it up with my embossing heat tool and added tiny dots of Star Dust Stickles to the sprinkles. I also used Yellow Stickles on the candle flame. I'm hoping you can see the dimension a little better in the closeup photo. I also added a few randomly placed Sparkles to the dotted paper. While the bow wasn't in my original plan, the finished card looked like it still "needed" something. It was a fun card to make.

Materials & Tools: White Daisy and Blush cardstock; My Mind's Eye Penny Lane Tiny Dancer "Jazz" Moving Dots paper; Blush, Citrus Leaf, Sunny Yellow, and Juniper ink pads; Maya Road Singleton Cupcake and Stampendous Flexible Friendship Wishes stamp sets; Ribbon from Wal-Mart; Sparkles; White Liquid Applique; Star Dust and Yellow Stickles; Embossing heat tool.

About the digital magazine again, the online version of Cards is very nice. It loads fast and is easy to manipulate and view compared to other digital magazines and catalogs I've experienced. As for advantages, the digital version is 75 percent less costly than the print version. While I've always considered this beautiful magazine to be worth every penny of its $19.95 newsstand price, it's also a magazine and one that someone who lives in a small space will eventually have to get rid of. Still, I'm one who likes to hold a magazine or book in my hands, and as a writer I hate to see print publications disappear ... even though my rational mind knows someone has to write what appears in digital/online form. Additionally, my Cards magazine will not become a "bathroom reader" unless I get a laptop. LOL. Anyway, these are the pros and cons from my perspective.

How was your day? Mine was OK - busy with (thankfully) no hassles. Every day this week is going to be busy, which is fine with me. On the home front, I need to get back into my organization mode, and I'd like to get my spring cleaning done prior to summer showing up ... if it does. The weather gurus are not predicting temperatures above 68° for the next 10 days. The low predicted for tomorrow night is 34°. That's crazy for June even in the frozen tundra. In closing, I hope your day was a good one and that tomorrow is, too. I'll catch you then!

Sunday, May 31, 2009

Tattered Sparrow

Before I tell you about my card, I need to retract the statement I made in my last post about ink not sticking to the set of stamps I used on my last card. Out of curiosity, I tried the new stamps using an ink pad from Papertrey Ink. The image was perfect. Then, I tried a couple different colors from Close To My Heart. Again, the images were flawless. For whatever reason, they don't stamp well with Tulip ink, and as that is what I was using at the time, I became frustrated. While I believe the statement about all polymer not being created equal to be somewhat true, I can't say I've had a lot of problems with stamps from the various companies. Once they're seasoned (and some stamps require more seasoning than others), most polymer stamps, providing the etching is deep enough, provide a clear image. A stamper long before polymer stamps were invented, I still have an appreciation for images produced by rubber stamps, too, even though they clearly (no pun intended) are not as easy to use.

Now, about my card. It was made in stages between games of Cootie, Memory, and Hide the Thimble with Mathias. The focal point image - rubber on cling mount - is by Tim Holtz. While I love the look, I wasn't sure what to do with it at first. Most certainly, it isn't a stamp to be used with anything "cute." The background I created for it just kind of evolved. I used a variety of stamp sets and Black, Bamboo, and Desert Sand ink pads. The antiquing was done using the direct-to-paper technique. I like the way it turned out and wouldn't mind random stamping a couple of 12x12-inch sheets of Bamboo cardstock like this just to have around.

Materials & Tools: Colonial White, Bamboo, and Black cardstock; Black, Bamboo, and Desert Sand ink pads; Tim Holtz Tattered Sparrow rubber stamp; Inkadinkado Butterflies & Birds, Stampendous Flexible Friendship Wishes, and Close To My Heart Air Mail (retired) and Lovely Lace stamp sets; Pewter photo clips and mini brads; Stampin' Up Word Window punch.

I had a lovely afternoon with the boys. We did a little laundry and played some games. A current favorite, "Hide the Thimble" isn't a purchased game but rather one I played with my grandma when I was a little girl. Mathias and I don't use a thimble but rather a small object of his choosing. Today it was a Cootie leg. The game simply involves taking turns leaving the room while the other person hides the object and then taking turns finding it. If you're close to the object, you're "hot" and if you're on the wrong side of the room, you're "cold." Words such as warmer, cooler, freezing, and on fire come up in the conversation, too. It took Mathias a while to catch on to the hot/cold concept, but I noticed he had it down pat today. So often when I'm playing with the boys I remember the special times I had with my grandma. I hope my little ones have similar memories someday.

Did you have a good weekend? I hope so. With another busy workweek ahead of me, I'm going to turn in early tonight. Have a good week, my friends ...

Saturday, May 30, 2009

Simple Saturday

My Simple Saturday card was insprired by one I saw on the Stampendous website.

Materials & Tools: White Daisy, Black, Buttercup, and Cranberry cardstock; Black ink pad; Garden Green marker; Stampendous April Showers Flowers and CTMH Boutique Borders stamp sets; Black gingham ribbon.

I went to bed early with intentions of sleeping in this morning. Instead, I woke up early. That was OK as it was nice to have some time to do some things before getting ready to go to Fargo. It looks like it's going to be a beautiful day. I commented on Facebook last night that now the thermometer finally hit 70 degrees, it's time for a new photo. I haven't seen a snowflake for a couple of weeks now, and the chance for more should be slight - for a few months, anyway! On that note, I'm off ... Enjoy your day! Later ...

Friday, May 29, 2009

hello ... hello ... hello ...

Recently, I've been trying to stamp "intentionally," as in make something besides feminine cards that only suit adult women.

Last night, I endeavored to make a birthday card for an adult male. However, I must not have been in the mood, because I finished this one and pretty much left my corner in disgust. Looking at it tonight, I'm thinking it's not so bad and would certainly be OK for most men who don't give two hoots anyway. LOL.

Materials & Tools: Colonial White and Indian Corn Blue cardstock; Retired CTMH Naturals cardstock; Basic Grey Granola 6x6-inch paper pad; Cocoa and Bambo ink pads; Retired CTMH Vintage Father's Day stamp set; Pewter photo clips, mini brads, and conchos; Circle Window Charms; Sponge dauber; Sanding block.

This second card is my take on Weekend Sketch Challenge #83, hosted by Lori Craig on her Make a Difference blog. I bought this stamp set at Archiver's and could swear it said "Exclusive for Archiver's" on the packaging. I guess not, or perhaps it was exclusive to Archiver's at one time and has now been brought into the regular line. Who knows? I was so excited to finally step into that store, I might have imagined it. Back to my card, it's relatively self-explanatory. It was pretty boring before I thought to to add the "stitching," which made it kinda fun.

Materials & Tools: White Daisy, Sunflower, and Chocolate cardstock; Memory Box 6x6-inch paper pad; Chocolate and Garden Green ink pads; Garden Green Marker; Stampendous April Showers Flowers and CTMH Simple Stitches stamp sets; Buttons from my stash; Brown embroidery floss; Sanding block.

It's been a fine Friday. I got done with work early and was home by 3:30, which was enough to make me happy as a lark.

Cameron had a cute story for me today, too. It seems Bjorn lost his second tooth last night. He followed Daddy's instructions and placed it under his pillow for the Tooth Fairy, and when he checked this morning, lo and behold, she'd been there. "She left me a dollar!" "Wow," Cameron said, sharing his excitement. "But," Bjorn exclaimed, "she took my tooth! Where am I going to get another tooth?" Then, he became even more concerned, because he didn't have it to "show Papa." That's when Cameron told Bjorn he'd call the fairy and see if he could buy it back. Funny and sweet, huh?

Do you have plans for the weekend? Dustin informed me that we're leaving for Fargo at 10 a.m. Have I mentioned that the men in the wedding party are buying suits instead of renting tuxedos? A men's clothing store, Halberstadt's, at West Acres Mall in Fargo, outfits wedding parties with suits, shirts, and ties for only a few dollars more than it would have cost to rent the tuxes. They require the men to show up in person twice, the first time for measurements and the second to fit the suit for alterations, which are included in the cost. While that seems almost too good to be true to me, I suppose they are guaranteed enough sales that they are able to discount them. The fact that there shouldn't be any clothing disasters in the 11th hour is quite appealing to me. Between proms and weddings, we've had our share of tuxedo troubles in the past. It is Marv who is being measured tomorrow, and while he and Dustin are doing that, Miranda and I are going to hit the craft stores to see if we can get some ideas for decorations. I'm a little bit worried that there isn't going to be much out there for fall just yet, but hopefully, we'll see something that sparks some thoughts. I've got invitations to design but really need a feel for what she likes and is thinking of in the way of a theme.

Before this turns into the longest post ever, I'll close with a wish that yours is a wonderful weekend. I'm off to my corner to see if I can't come up with something for Simple Saturday ... Later!